Browsing Workspace Resources
The Sidekick Resources sidebar is the single home for everything Sidekick has recorded about your current workspace. It brings together four kinds of resource in one browse list:
- Notebook entries — findings, tasks, and outcomes recorded during analysis.
- Indexes — named collections of binary locations.
- Code Maps — persistent call-graph views built around root functions.
- Repositories — versioned file stores scoped to the workspace.
Open Resources from the sidebar panel on the right side of the Binary Ninja window. Because the sidebar is workspace-scoped, one Resources panel serves the whole workspace — it does not reset when you switch between binary view tabs in a multi-binary project. See Switching between binaries for how Resources behaves across a project's binaries.
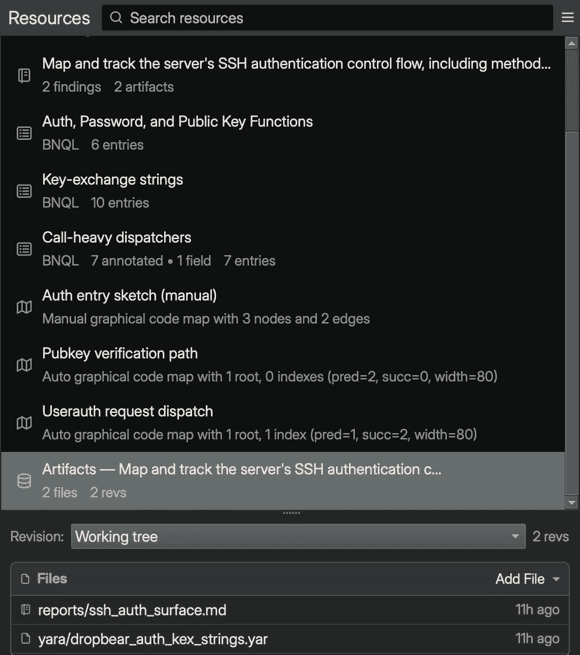
The browse list and detail view
Resources uses the same two-surface layout as the other Sidekick sidebars:
- Browse list — one flat list of every resource in the workspace, grouped by kind (notebook entries first, then indexes, code maps, and repositories) and sorted within each kind by recency or another kind-specific order.
- Detail view — shows the full content of whichever resource is selected: a notebook entry's tasks and outcomes, an index's entry table, a code map's graph, or a repository's file browser.
When the sidebar is narrow, the list and detail views stack and you navigate between them. When the sidebar is wide enough, both surfaces appear side by side with a draggable splitter between them.
Search
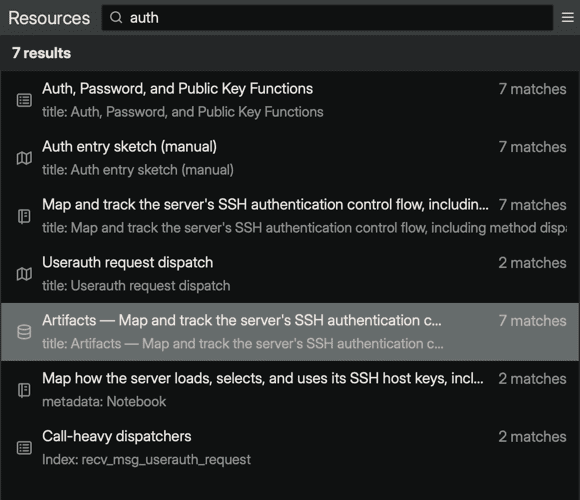
The search box at the top of the browse list searches all four resource kinds at once.
Typing a query runs two searches together:
- A quick search that matches immediately against each resource's title, kind, and summary text.
- A deep search that runs a short delay after you stop typing and searches inside each resource's content — index entries, notebook outcome and task text, code map nodes, and repository file names — using that resource's own search behavior.
Matching resources show the number of hits as a subtitle, and results are ranked with the highest hit count first.
Creating resources
Resources supports creating indexes and code maps directly, plus a dedicated input for notebook entries:
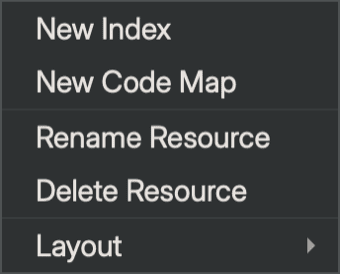
- New Index and New Code Map — open the hamburger menu (the three-line Menu button in the sidebar header) and choose one of these options. See Creating an Index and Creating a code map for what happens next.
- Notebook entries — type into the "Add a new entry" input at the bottom of the browse list and press Enter. See Creating Entries for how Sidekick interprets what you type.
Repositories are not created directly from this menu. A workspace repository comes into existence indirectly — for example, when a script or a per-entry notebook artifact needs somewhere to store files. See Workspace Repositories for details.
The context menu
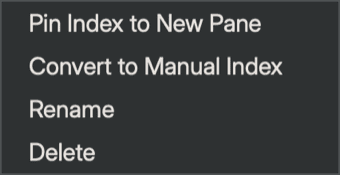
Right-click any resource in the browse list to see the actions available for it. Which actions appear depends on the resource's kind:
- Show Details — appears only in narrow layout; switches to the detail view for the selected resource.
- Pin to New Pane (labeled "Pin Index to New Pane", "Pin Code Map to New Pane", and so on for the selected kind) — opens the resource's detail in a standalone Binary Ninja pane that stays visible alongside the main view, independent of the sidebar. Available for every kind.
- Convert to Manual Index — indexes only; converts a BNQL or Script index into a manually curated one.
- Show in Finder / Show in Explorer / Show in File Manager (label depends on platform) — repositories only; opens the repository's on-disk working copy in your file manager.
- Rename — available for indexes, code maps, and repositories. Notebook entries are renamed by editing their description inline instead.
- Delete — available for every kind, including notebook entries. Deleting always asks for confirmation first.
Resource kinds
Each resource kind has its own detail view and its own dedicated guide. This page covers what they share in Resources; the linked guides cover kind-specific workflows in depth.
Notebook entries
Notebook entries record findings, tasks, and outcomes from your analysis. Selecting one shows its description, status, tasks, and outcomes in the detail view. See Recording Analysis in the Notebook for the full workflow, including entry types, task and outcome management, and session briefings.
Indexes
Indexes are named collections of binary locations built from a query, a script, or manual curation. Selecting one shows a sortable, filterable entry table with a Query Editor above it. See Building and Using Indexes for index types, BNQL queries, and metadata columns.
Code Maps
Code Maps are persistent call-graph views built around a set of root functions, optionally overlaid with index entries. Selecting one shows the graph and its configuration controls. See Visualizing with Code Maps for auto mode, manual mode, and graph navigation.
Repositories
Workspace repositories are versioned file stores scoped to the current workspace, distinct from the shared application Library. Selecting one shows its files, commit history, and working tree. See Workspace Repositories for how they differ from Library items and when to use them.